Wednesday, December 5, 2012

DIY Earrings

It's been a while since I posted, but with Christmas around the corner I have been getting a little more creative. Here are some earrings I made the other day.

Supplies:
  • Spare parts (the scrapbooking embellishments)
  • Jewelry/metal glue
  • Earring backs
  • Scissors

1. Twist or cut the stems (what are they even called?) from the back of the spare part.
2. Put a small amount of glue on the flat part of the of the earring back.
3. Press the earring back to the back of the spare part, hold it for couple of seconds.
4. Wear! Once the glue is dry of course! Super easy and super cute!


These earrings are Kate Spade inspired...a simple furniture button, half painted and half left wood. Glue the earring on the back on the back and you are done. You can free hand the paint or use painters tape to get a crisp line.


Sunday, September 2, 2012

No Knead Crock-Pot Artisan Bread

No Knead? Crock-Pot? Yes really! In fact it is even a No Rise recipe as it does that in the crock-pot!

 Supplies:
  • 3/4 Tablespoon Yeast
  • 1 1/2 Cups of warm water (as hot as your tap water will go is fine)
  • 1/2 Tablespoon Salt
  • 3 1/4 Cups of Flour (I used unbleached bread flour)
  • Parchment Paper

1. Mix your warm water and salt in a bowl. Add in the yeast and let it stand for 1-2 minutes, don't worry if it doesn't all completely dissolve.


2. Now add your flour. Be as exact as you can. Fill your cup and run over it with a knife to level it off. If you would like to add some seasonings or extras for taste do it now before your start to mix.


3. Using a spatula mix your dough. Form it into a ball and place it on some parchment paper.


4. Lower your parchment paper and dough into the crock-pot and set it to high. Cook time will vary with each crock-pot. Mine took about 1 1/2 hours.


5. The bread is ready when you poke it and it springs back up. The one down side to the crock-pot method is that it doesn't really crisp the outsides which is a big part of Artisan Bread. I just popped the bread in the oven on broil until it was crispy enough and it came out perfect. Make sure to broil the top and bottom. The loaf below has basil and sun-dried tomatoes per request of my husband.


6. Let the bread completely cool before eating otherwise it may seem a little under cooked. Go ahead and heat it up later and enjoy with some butter or spread of your choice

Thursday, August 30, 2012

Painting Laminate - End Table

I have been in search of a cute end table for a while...I wanted something more unique than a $10 Ikea table so I searched the classifieds. I found this dresser for $5, unfortunately it had a laminate finish, but I decided I could work with that. After a little anxiety at points thinking there was no way the end product would look good I am surprisingly happy with the end result.

 Supplies:
  • Furniture of choice
  • 1-2-3 Primer...this means no sanding...seriously!
  • Paint color of choices
  • Cabinet roller
  • Paint bruches
  • Paint tray
  • Protective cloth

1. Dust off your piece. Take draws out and paint the whole thing with primer. It is a little tedious if you have some grooves like I did. I ended up doing two coats of primer. Let it dry for the specified time (ok maybe I didn't wait that long, but hey it still worked!)


2. Yes Dr. Pepper was apart of my supplies...Next is the fun part, applying your color. Be patient! Due to the laminate finish you are going to need to do multiple coats...and by multiple I did about 6, make sure you let the paint completely dry between coats! Let it dry after the last coat and place for all to see! It is such a great way to add a pop of color to your room!

3. It really is pretty easy, you can also do the same thing with spray paint primer and color, but using the flat paint gave me a more rustic looks rather than a glossy look that you would get with the spray paint.

Tuesday, July 10, 2012

Mini Cheesecakes

I love cheesecake! I have seen some recipes for individual mini cheesecakes and have tried some out. I can't say I completely loved everything about one specific recipe so I decided to combine and adjust multiple recipes.

Supplies:
  • 1 Packet of Graham Crackers
  • 3 tsp butter
  • 16oz Cream Cheese
  • 2 Eggs
  • 2 Tbs Flour
  • 3/4 Cups Sugar
  • 1/4 tsp Baking Powder
  • 1 Tbs Lemon Juice
  • 1 1/2 tsp Vanilla Extract 
  • Cupcake Liners
  • Fillings of your choice (fruit, cream, caramel, pie filling)


  1.  Put one packet from your box of Graham box in a zip lock bag. Use a rolling pin to crumble the crackers. 
  2. Once crumbled put the crackers in a bowl, melt the butter and mix. The cracker crumbs should start to clump together.


3. Put your liners in your cupcake tin. Line the bottom of each liner with a layer of the cracker crumbs. Using a spoon press down the crumbs so they stick together and to the bottom of the liners.

4. Using an electric mixture cream together the Cream Cheese and Sugar.

5. Add flour and baking powder and continue mixing.

6. 1 at a time at your eggs, lemon juice and vanilla.

7. Mix for 5-7 minutes on high. You will want to make sure you mix the mixture really well so you   aren't left with clumps of Cream Cheese.
 8. Fill each liner all the way to the top with your mixture. Don't worry about it rising too much. Once it has cooled down it will dip in the middle.

9. Cook on 375 F for 18 minutes or until a toothpick comes out clean. The longer you cook them the deeper the dip will be when it cools.

10. Let the cheesecakes cool completely and put in the fridge for a few hours.
 11. Fill the  cheesecakes with your choice of topping.

Honestly, these came out looking kind of ugly this time. I'm not sure why, but regardless of the look they are yummy, yummy, yummy! Good luck!


Sunday, June 24, 2012

Carmel Popcorn


We love us some popcorn in our family. Tonight we decided to try and make some Carmel Corn. We found our recipe at the amazing site Our Best Bites.

If you are looking for healthy, this is not the recipe for you, if you are looking for yummy, you are in the right place! 

Happy Sunday!

Friday, June 22, 2012

Princess Hat

Do you have a Princess in your life? If so, this is a simple, quick and fun craft for her. Miss L. and I completed her Princess hat in about 30 minutes this morning.

Supplies:
  • Cone (you can either buy one of these at a craft store or make one yourself)
  • Cardstock/Paper (12x12)
  • Ribbon
  • Embellishments of choice (Fabric, stickers, jewels etc.)
  • Glue/Staples/Tape

Step 1: We got some Cinderella scrapbook paper and cut out the picture of Cinderella.

Step 2: Using the rest of the paper cover the cone (you could also make the cone out of the left over paper if it is sturdy enough).

Step 3: Measure your ribbon so that it is long enough to be tied around your Princesses chin like a bonnet. Cut in two.

Step 4:Secure the ribbon on each side.

Step 4: Add embellishments. This is where we added a purple rim from foam, a cut out of Cinderella and some tassels on top.


Now you have one happy Princess!

Thursday, June 21, 2012

Bubble Art

 Another project I did with Miss L. this week was Bubble Art. She LOVES to blow bubbles and she LOVES to paint, so why not combine the two?

Supplies:
  • Bubbles (buy or make your own)
  • Food Coloring
  • Straw
  • Paper

Step 1: Mix your bubbles and food coloring

Step 2: Stick your straw in the bubbles so that you get a colored film on the end

Step 3: Blow through the straw on the paper

Step 4: Pop any bubbles that land on the paper (this was Miss L's favorite part)


Wednesday, June 20, 2012

Colored Pasta

This week I have been watching my 2 nieces. Miss L. is 3 and therefore needs a little more entertaining than Mr L. and Miss E. She loves Princesses and anything pink, she is a girl through and through. This morning we decided we would color some pasta and make some pretty necklaces.

Supplies:
  • Uncooked Pasta (we used macaroni, but you could also use penne) 
  • Food Coloring
  • Hand Sanitizer (with alcohol)
  • Zip Lock Bags
  • Thread/Twine

Step 1: Squirt some hand sanitizer into your baggie (approximately a tablespoon) and then add 3-4 drops of food coloring (you may want to add more or less depending on preference, also if you use the gel food coloring you probably won't need as much as it tends to be stronger).

Step 2: Mix the hand sanitizer and food coloring together.

Step 3: Add 1/2 cup of macaroni (uncooked)


Step 4: Shake the pasta around in the bag and knead it until all the pasta is covered in your desired color. It is not too late to add more color if needed. If you use penne, be careful not to punch a hole in the bag when kneading.

Step 5: Spread the pasta out on a surface of your choice to dry. Remember the food coloring will stain things when wet so use something old or some paper plates. Let the pasta sit for a few hours to dry.


Step 6: ENJOY! We made necklaces, but you could also use it for art or as an alternative for sand.

Monday, June 18, 2012

Pasta Fresca From Noodles & Co.


Have you ever been to Noodles & Co? If not and you have one near by go...NOW! If not you can enjoy the deliciousness of their Pasta Fresca dish in your own home with this recipe!
I get this dish every time we go and I was so happy when this recipe turned out to taste just like the real thing!

Serves 5-6 people
Ingredients:

For Pasta:
  • 16oz Penne Pasta (But any kind will work)
  • 3-4 medium sized Roma Tomatoes 
  • Baby Spinach 
  • 1 Red Onion
  • 3-4 Gloves of Garlic
  • 2 tsp Extra Virgin Olive Oil
  • Salt and Cracked Pepper (to taste)
For Vinaigrette:
  • 1/3 Cup of Extra Virgin Olive Oil
  • 4 Tbs of Balsamic Vineger
  • 4 Tbs of Sweet White Wine (We used a Chardonnay and it worked out great) 
  • 1 tsp Salt
First of all cook your pasta al dente (slightly chewy). If you are still chopping your vegetables when the pasta is cooked, drain it and cover it in cold water so it doesn't become all sticky.

Whilst your pasta is cooking you can make the Vinaigrette. In a bowl or jug mix all the vinairgrette ingredients together with a hand whisk.

Next mince the garlic, chop your onions and tomatoes. 

Heat 2 tsp of oil in a saute pan on a medium heat. Saute the garlic and then add the already strained and cooked pasta, tomatoes and onion. Saute for approximately 3-5 minutes, add salt and pepper to taste. Gradually add the vinaigrette and saute until the pasta browns a little. Add the baby spinach and saute until the spinach starts to wilt a little.

There you have it! Yummy! We served ours with breaded chicken (I didn't post the recipe because to be honest I have mastered the art of this yet and it didn't seem worth sharing) and rolls.

ENJOY!

Sunday, June 10, 2012

Homemade Spice Cake & Cream Cheese Frosting


Today is my wonderful husband's birthday. Usually when I ask him what cake he wants he just says anything with chocolate frosting...he says that because he knows chocolate frosting it really the only kind of frosting I like. But this year I told him chocolate wasn't an option and that I was making his cake from scratch. He chose a spice cake with Cream Cheese Frosting. Lets start with the cake...

Supplies:
3 cups cake flour
2 teaspoons baking powder
1 teaspoon baking soda
1 teaspoon ground nutmeg
1 teaspoon ground cinnamon
1 teaspoon ground ginger
1/2 teaspoon ground cloves
3/4 teaspoon all spice
2 sticks butter, softened
2 cups sugar
1/2 teaspoon salt
4 eggs
1 1/4 milk

Directions:
  • Preheat oven to 350 F
  • Spray and flour pans, I used two 8 inch round pans, but 3 probably would have been better
  • Combine and mix flour, spices and salt in a large bowl
  • Mix butter and sugar until creamy, mix in eggs
  • Gradually mix in the dry ingredients and the milk with the the butter/sugar/egg mixture. Start with the dry ingredients and end with the dry ingredients
  • Divide the mixture into cake pans
  • If using 2 pans cook for 30 minutes, if using 3 cook for 20-25 minutes
  • Once cooked let them cool for about 10 minutes before removing from pan
  • Let them cool completely before frosting

Now onto the Cream Cheese Frosting

Supplies:
8oz of cream cheese, chilled
6 1/2 tablespoons of unsalted butter, room temperature
3 1/4 cups powdered
4 teaspoons of vanilla extract

Directions:
  • Mix cream cheese and butter until smooth
  • Gradually mix in the powdered sugar
  • Add vanilla extract and mix
If you plan on covering the whole cake like I did you may want to double the frosting recipe.

Enjoy! The frosting will be way better than anything you can buy in the store!

Wednesday, May 9, 2012

Jazzing Up Those Bathroom Accessories

Having an extra bathroom meant we needed new bathroom accessories. All the super cute soap dispensers and toothbrush holders were about $12 a pop. There was no way I as paying that. Instead I got crafty and ended up with some darling accessories that look almost as good as the real thing.

Supplies:
  • Soap dispenser ect. (Mine were $1.88 a piece at WalMart)
  • Spray paint of your choice 
Before: Pretty ugly right?

The project is as simple as; spray paint and leave to dry. Make sure to not get too close other wise you may get some drips...I got a few eeks. 


After: Not bad huh? Here is the spray paint I used just in case you want the same look. 

Sunday, May 6, 2012

Key Hook Frame

We just moved apartments and our life is in boxes and taking forever to organize, but I did find the time and supplies to do a simple project today. I found this old picture, I've probably had it since I was about 16. The print is not really my style anymore, but the frame is really cute so I decided to make a Key Hook Frame.

Supplies:
  • Frame of choice
  • 2-3 hooks
  • Wire


First I removed the back, print and glass. 


Then I added some hooks I randomly found in my husband's tool box. This was probably the hardest part, I ended up using a hammer to start the hole off and then I was able to screw it in the rest of the way. 


I attached some wire to the back to hang it on. I was lucky and there was already some staples on the back that I could feed it through, if you don't have that you could probably use a staple gun to secure the wire. 


Simple, yet cute! 

Sunday, April 29, 2012

Tips by Kymee: Removing Blood


I can't really take credit for this tip as my Mother recently gave it to me, but it is a little lifesaver that you need to know. 


To remove blood from fabric:
  1. Do this as soon as you can,and DO NOT wash it first
  2. Immerse the blood in cold water
  3. Cover in salt
  4. Leave to soak
  5. Be AMAZED!

Saturday, April 28, 2012

Multi Colored Cake

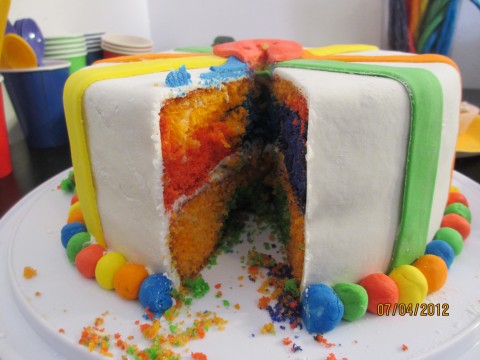
How to make your very own multicolored cake :) 

Supplies:
  • 2 white cake mixes
  • Food coloring
  • 16 oz bag of mall Marshmallows
  • 1 teaspoon of vanilla
  • 4 tablespoons of water
  • 2lbs of powdered sugar
  • Butter


  1. Follow the mixing directions on your cake mix box. The cake MUST be a WHITE cake. I learned this the hard way by using a yellow cake mix the first time, it tinted all the colors.
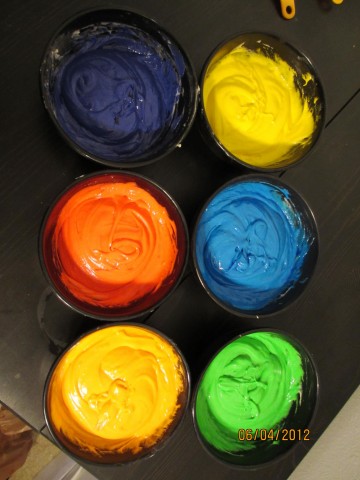
  2. Separate the batter into 6 bowls (change the number to match the number of different colors you have)
  3. Use your food coloring to make your colors


4. Randomly plop each color into a sprayed and floured cake tin until you have used about half of your cake batter. Note, you do NOT need to swirl the batter around to get the rainbow effect.

5. Do the same with the rest of your batter in a second tin. Bake as directed.

6. Whilst your cake is cooking/cooling you can work on your fondant. Empty the whole bag of marshmallows into a microwave safe bowl. Add the water and vanilla. Start by putting it in the microwave for 1 minute. Then mix the marshmallows, you will want to heat and mix until you end up with a gooey, sticky mess. Cover your hands in butter and start mixing in the powdered sugar. This isn't easy to make so you will have to be patient. Keep adding the sugar until you get the right consistency (a little tougher than play-dough).

7. If you are adding different colors you will want to divide the marshmallow goo and add the dye before you add the powdered sugar. 

8. Once your cake is cooled, frost away and start decorating. Save a little frosting for later.

9. COVER your counter in powdered sugar, roll and cut your fondant until you have the sizes and shapes you want. When adding designs  using the frosting you saved to help them stick, kind of like a glue.

10. By the time you are done you will be covered in powdered sugar, but you will be in love with the end results!

Happy baking and decorating!


Saturday, April 21, 2012

Button Monogram

A couple of weeks ago we found out we are moving. We will be saying farewell to Lucas' cute green room and so of course I am already brainstorming his new room. Below is a a Button Monogram I made.

Supplies:
  • Wood letter(s)
  • Paint
  • Buttons
  • Hot Glue Gun


 I already had a painted "L" that I never got around to putting up in Lucas' current room. I purchased it from Hobby Lobby and had painted it a teal color. (Sorry the pictures aren't too great)


I also purchased a Bag O' Buttons from Hobby Lobby, they had different color themes, I chose the bright theme.


So once your letter is painted, and your glue gun heated start gluing those buttons. You have to think about where you are placing the buttons so that you don't leave to many big gaps. I found it easier to lay the buttons out and place a few of them on before gluing them down.

Half way through

Just keep gluing those buttons on and whala! You have a completed Button Monogram...and maybe a few burns on your fingers! :)