Wednesday, June 20, 2012

Colored Pasta

This week I have been watching my 2 nieces. Miss L. is 3 and therefore needs a little more entertaining than Mr L. and Miss E. She loves Princesses and anything pink, she is a girl through and through. This morning we decided we would color some pasta and make some pretty necklaces.

Supplies:
  • Uncooked Pasta (we used macaroni, but you could also use penne) 
  • Food Coloring
  • Hand Sanitizer (with alcohol)
  • Zip Lock Bags
  • Thread/Twine

Step 1: Squirt some hand sanitizer into your baggie (approximately a tablespoon) and then add 3-4 drops of food coloring (you may want to add more or less depending on preference, also if you use the gel food coloring you probably won't need as much as it tends to be stronger).

Step 2: Mix the hand sanitizer and food coloring together.

Step 3: Add 1/2 cup of macaroni (uncooked)


Step 4: Shake the pasta around in the bag and knead it until all the pasta is covered in your desired color. It is not too late to add more color if needed. If you use penne, be careful not to punch a hole in the bag when kneading.

Step 5: Spread the pasta out on a surface of your choice to dry. Remember the food coloring will stain things when wet so use something old or some paper plates. Let the pasta sit for a few hours to dry.


Step 6: ENJOY! We made necklaces, but you could also use it for art or as an alternative for sand.

Monday, June 18, 2012

Pasta Fresca From Noodles & Co.


Have you ever been to Noodles & Co? If not and you have one near by go...NOW! If not you can enjoy the deliciousness of their Pasta Fresca dish in your own home with this recipe!
I get this dish every time we go and I was so happy when this recipe turned out to taste just like the real thing!

Serves 5-6 people
Ingredients:

For Pasta:
  • 16oz Penne Pasta (But any kind will work)
  • 3-4 medium sized Roma Tomatoes 
  • Baby Spinach 
  • 1 Red Onion
  • 3-4 Gloves of Garlic
  • 2 tsp Extra Virgin Olive Oil
  • Salt and Cracked Pepper (to taste)
For Vinaigrette:
  • 1/3 Cup of Extra Virgin Olive Oil
  • 4 Tbs of Balsamic Vineger
  • 4 Tbs of Sweet White Wine (We used a Chardonnay and it worked out great) 
  • 1 tsp Salt
First of all cook your pasta al dente (slightly chewy). If you are still chopping your vegetables when the pasta is cooked, drain it and cover it in cold water so it doesn't become all sticky.

Whilst your pasta is cooking you can make the Vinaigrette. In a bowl or jug mix all the vinairgrette ingredients together with a hand whisk.

Next mince the garlic, chop your onions and tomatoes. 

Heat 2 tsp of oil in a saute pan on a medium heat. Saute the garlic and then add the already strained and cooked pasta, tomatoes and onion. Saute for approximately 3-5 minutes, add salt and pepper to taste. Gradually add the vinaigrette and saute until the pasta browns a little. Add the baby spinach and saute until the spinach starts to wilt a little.

There you have it! Yummy! We served ours with breaded chicken (I didn't post the recipe because to be honest I have mastered the art of this yet and it didn't seem worth sharing) and rolls.

ENJOY!

Sunday, June 10, 2012

Homemade Spice Cake & Cream Cheese Frosting


Today is my wonderful husband's birthday. Usually when I ask him what cake he wants he just says anything with chocolate frosting...he says that because he knows chocolate frosting it really the only kind of frosting I like. But this year I told him chocolate wasn't an option and that I was making his cake from scratch. He chose a spice cake with Cream Cheese Frosting. Lets start with the cake...

Supplies:
3 cups cake flour
2 teaspoons baking powder
1 teaspoon baking soda
1 teaspoon ground nutmeg
1 teaspoon ground cinnamon
1 teaspoon ground ginger
1/2 teaspoon ground cloves
3/4 teaspoon all spice
2 sticks butter, softened
2 cups sugar
1/2 teaspoon salt
4 eggs
1 1/4 milk

Directions:
  • Preheat oven to 350 F
  • Spray and flour pans, I used two 8 inch round pans, but 3 probably would have been better
  • Combine and mix flour, spices and salt in a large bowl
  • Mix butter and sugar until creamy, mix in eggs
  • Gradually mix in the dry ingredients and the milk with the the butter/sugar/egg mixture. Start with the dry ingredients and end with the dry ingredients
  • Divide the mixture into cake pans
  • If using 2 pans cook for 30 minutes, if using 3 cook for 20-25 minutes
  • Once cooked let them cool for about 10 minutes before removing from pan
  • Let them cool completely before frosting

Now onto the Cream Cheese Frosting

Supplies:
8oz of cream cheese, chilled
6 1/2 tablespoons of unsalted butter, room temperature
3 1/4 cups powdered
4 teaspoons of vanilla extract

Directions:
  • Mix cream cheese and butter until smooth
  • Gradually mix in the powdered sugar
  • Add vanilla extract and mix
If you plan on covering the whole cake like I did you may want to double the frosting recipe.

Enjoy! The frosting will be way better than anything you can buy in the store!

Wednesday, May 9, 2012

Jazzing Up Those Bathroom Accessories

Having an extra bathroom meant we needed new bathroom accessories. All the super cute soap dispensers and toothbrush holders were about $12 a pop. There was no way I as paying that. Instead I got crafty and ended up with some darling accessories that look almost as good as the real thing.

Supplies:
  • Soap dispenser ect. (Mine were $1.88 a piece at WalMart)
  • Spray paint of your choice 
Before: Pretty ugly right?

The project is as simple as; spray paint and leave to dry. Make sure to not get too close other wise you may get some drips...I got a few eeks. 


After: Not bad huh? Here is the spray paint I used just in case you want the same look. 

Sunday, May 6, 2012

Key Hook Frame

We just moved apartments and our life is in boxes and taking forever to organize, but I did find the time and supplies to do a simple project today. I found this old picture, I've probably had it since I was about 16. The print is not really my style anymore, but the frame is really cute so I decided to make a Key Hook Frame.

Supplies:
  • Frame of choice
  • 2-3 hooks
  • Wire


First I removed the back, print and glass. 


Then I added some hooks I randomly found in my husband's tool box. This was probably the hardest part, I ended up using a hammer to start the hole off and then I was able to screw it in the rest of the way. 


I attached some wire to the back to hang it on. I was lucky and there was already some staples on the back that I could feed it through, if you don't have that you could probably use a staple gun to secure the wire. 


Simple, yet cute! 

Sunday, April 29, 2012

Tips by Kymee: Removing Blood


I can't really take credit for this tip as my Mother recently gave it to me, but it is a little lifesaver that you need to know. 


To remove blood from fabric:
  1. Do this as soon as you can,and DO NOT wash it first
  2. Immerse the blood in cold water
  3. Cover in salt
  4. Leave to soak
  5. Be AMAZED!

Saturday, April 28, 2012

Multi Colored Cake

How to make your very own multicolored cake :) 

Supplies:
  • 2 white cake mixes
  • Food coloring
  • 16 oz bag of mall Marshmallows
  • 1 teaspoon of vanilla
  • 4 tablespoons of water
  • 2lbs of powdered sugar
  • Butter


  1. Follow the mixing directions on your cake mix box. The cake MUST be a WHITE cake. I learned this the hard way by using a yellow cake mix the first time, it tinted all the colors.
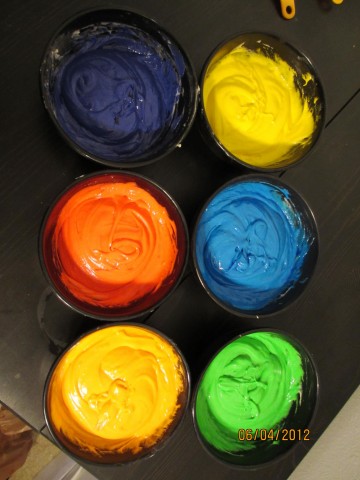
  2. Separate the batter into 6 bowls (change the number to match the number of different colors you have)
  3. Use your food coloring to make your colors


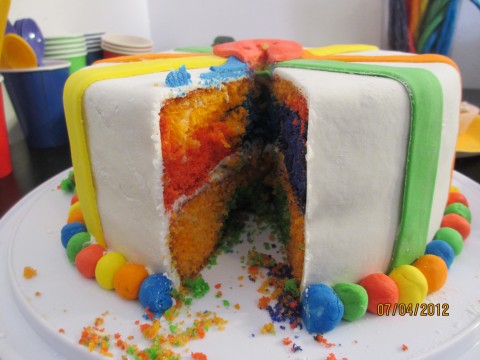
4. Randomly plop each color into a sprayed and floured cake tin until you have used about half of your cake batter. Note, you do NOT need to swirl the batter around to get the rainbow effect.

5. Do the same with the rest of your batter in a second tin. Bake as directed.

6. Whilst your cake is cooking/cooling you can work on your fondant. Empty the whole bag of marshmallows into a microwave safe bowl. Add the water and vanilla. Start by putting it in the microwave for 1 minute. Then mix the marshmallows, you will want to heat and mix until you end up with a gooey, sticky mess. Cover your hands in butter and start mixing in the powdered sugar. This isn't easy to make so you will have to be patient. Keep adding the sugar until you get the right consistency (a little tougher than play-dough).

7. If you are adding different colors you will want to divide the marshmallow goo and add the dye before you add the powdered sugar. 

8. Once your cake is cooled, frost away and start decorating. Save a little frosting for later.

9. COVER your counter in powdered sugar, roll and cut your fondant until you have the sizes and shapes you want. When adding designs  using the frosting you saved to help them stick, kind of like a glue.

10. By the time you are done you will be covered in powdered sugar, but you will be in love with the end results!

Happy baking and decorating!